We use cookies to make your experience better. To comply with the new e-Privacy directive, we need to ask for your consent to set the cookies. Learn more.
Optimizing your Vitrification
CryoTip
The following points should be considered when using the CryoTip.
Before Use
- Inspect each CryoTip under the microscope before use. Check to make sure there are no cracks, defects or bends in the plastic. The front edge of the fine tip end should be flat and straight. If any cracks, bends or damage are apparent, DO NOT USE the CryoTip.
- Slide the metal cover sleeve up and down at least once. The slide tension of the cover sleeve should be firm but not score the plastic. Also, it should not be so loose that it slips up and down without assistance.
- Connectors are re-usable, we recommend you replace the connector approximately every 30 CryoTips.
- Wipe and clean the Teflon sheet and silicone rubber of the heat sealer with 70% ethanol to remove any debris. Debris on the heat sealer may prevent a complete heat seal.
- Recommended heat sealer is the impulse heat sealer. Each heat sealer will have its own unique characteristics. It is up to the operator to determine exactly which settings are best for their sealer. Practicing with multiple CryoTips is essential for determining these settings (refer to Heat Sealer Validation Protocol). You can heat seal the same CryoTip several times when validating your heat sealer, just make the next seal above the first and so on.
Approximate optimal settings for sealing each end of the CryoTip are:
• Fine tip end - low setting ~3
• Wide end - high setting ~6
The settings can be marked on the specific heat sealer so that the same respective settings are used every time for sealing the corresponding ends (fine and wide). Alternatively, you can validate two heat sealers, one for the fine tip end and one for the wide end. This method allows you to use a separate sealer for the fine end and the wide end to eliminate the need for adjusting heat settings between seals. Correct and complete sealing is key to achieving good recovery rates from the CryoTip.
6. Heat sealers should be re-validated annually.
Loading
1. We recommend that you use a glass Hamilton syringe to load the CryoTip. You can get these from www.hamiltoncompany.com. There are several sizes available but we recommend the 25uL syringe, this size gives you adequate control to easily load the CryoTip with <1uL of medium.
2. Pull back the syringe plunger slightly before attaching the CryoTip to prevent any capillary action. Hold the CryoTip steady and rotate the syringe slightly while pushing the CryoTip into the connector to get the best seal, continue applying pressure until you see approximately 1cm of the large end breach the seal between the CryoTip and Connector. Be sure that you push the CryoTip into the connector just enough so that the connector holds the CryoTip in place, do not push the CryoTip in too far.
3. Hold the metal cover slip from the fine tip end and slide it up towards the connector. Ensure that the metal cover sleeve does not go into the connector; this will make it difficult to achieve a good fit between the connector and CryoTip.
After Loading
1. Always ensure that when sealing the CryoTip your hand is steady and braced. Movement during sealing can lead to stress on the seal and result in a failure.
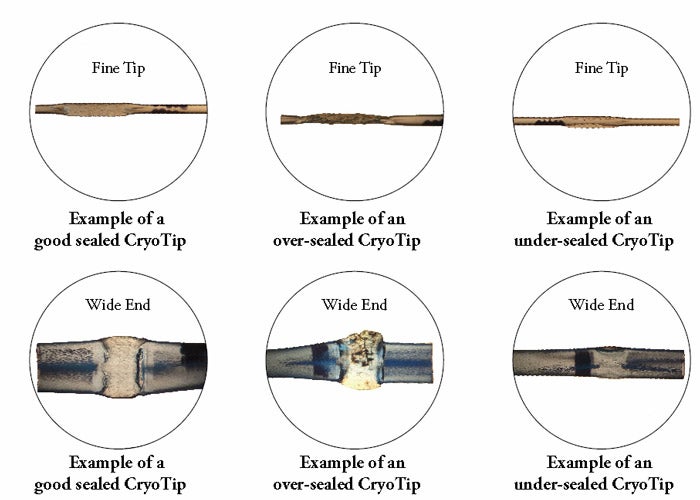
2. After heat sealing always visually check the seals using the microscope. Check the small end to be sure the seal is flat and melted without bends or kinks. Check the large end to be sure the plastic has a complete seal. If the heat seal is sufficient the imprint of the brown plastic coating of the sealer should be visible on the blue plastic of the CryoTip and there should be no cracks along the sealed edge of the large end radiating down toward the small tip.
3. If the large end of the CryoTip does not seal entirely you need to seal it again. Make the second seal just below the first seal.
4. Always adjust the heat settings to accommodate the large end (~6) and small end (~3) of the CryoTip.
5. Slide the metal cover sleeve completely down to the fine end until it stops to protect it during storage.
6. Plunge into LN2 and swirl for 3 seconds to maximize cooling rate.
Heat Sealing
Complete sealing is imperative to success with the CryoTip. It alleviates any compromise of the CryoTip at vitrification and at warming. It prevents leaking and exploding and minimizes the possibility of embryos lost due to user error. Correct sealing prevents the CryoTip from bending, which can cause stress cracks along the plastic adjacent to the seal. It is important to check all seals, every time.
Watch for
- Undersealing
- Oversealing
- Channels where LN2 could infiltrate through the seal
- Stress fractures next to the seal
During Warming
7. One of the most critical steps to warming is to achieve a rapid warming rate (+24,000°C/min). To maximize the warming rate with the CryoTip, move the CryoTip from LN2 to a large 37C water bath (>500mL) within 1 second. Swirl CryoTip for 3 seconds in water bath and continue with the recommended protocol for warming.
8. A pair of sharp scissors and a quick “snap” action when cutting away the fine tip end are essential to prevent the contents of the CryoTip from being accidentally dispensed onto the scissors.
9. Have your TS solution set-up and move your specimens into the solution as quickly as possible.
10. Specimens should be transferred to equilibrated culture medium containing 20% protein for complete recovery after warming.
Troubleshooting
1. If cracks occur upon plunging then most likely the seals were not complete before plunging. Check that the heat sealer platform is clean and sealing consistently, that the temperature setting is correct for each end of the CryoTip (giving a firm, melted seal), and that the user is using the sealer correctly (push the handle firmly, without crushing to seal, let up after the beep).
2. When just learning how to use the device you can seal and unload several CryoTips prior to implementing the system with specimens (oocytes and embryos). Load solution, seal, plunge into liquid nitrogen, remove, plunge into water, and unload. Make sure you can do this repeatedly without getting bubbles in the CryoTip or finding empty CryoTips. If CryoTip is empty then it wasn’t sealed correctly.
HSV Straw
To properly seal HSV straws, the right combination of heat, pressure, time and position of the straw must be guaranteed. Cryo Bio System has validated this for SYMS, SYMS II and SYMS III. This does not exclude that HSV straws can be airtight sealed with other models or types of sealers. However, use of another model or type of sealer is under the sole responsibility of the laboratory that is using it.